

If you want to publish your product on Inspire Uplift Marketplace in a way that:
It ranks on the first page of search engines for your target keyword.
Appear high up in the internal search of Inspire Uplift Marketplace.
This blog is for you.
But why should you do it?
- Higher search engine rankings accelerate the chances of your product being discovered by people worldwide. 88% of people start their online purchase process through search engines.
- Your chances of getting online sales improve quickly
- You will earn more cash.
- Your business and shop reach a global audience quickly.
So let’s begin.
Table of Contents
Step 1: Logging into the seller panel
Once you log into the seller panel with your credentials, you will see the dashboard screen.

Step 2: Selecting the products
Hover to the “Products” tab on the left side and press it. You will be taken to the product addition screen.

Step 3: Clicking to add a new product
Select “Add Product” from the top right side. It has the “+” icon for more ease.

Step 4: Writing the name of the product
Write the name of your product in the “Title” box. You are allowed to write a maximum of 120 characters.

Use the main keyword in the title. This will improve the chances of your product being ranked in the search engine (like Google, Bing, Yandex, Opera, etc) for that keyword.
You see.
The search engines use these keywords (words typed in the search engine by the users when searching for a product) to search their database.
When it sees an exact or related product title, it gets a sense that it is an accurate answer to the query typed by the user. It then arranges all the relevant results in their pages (1,2,3,4 and so…)
Users usually don’t go further than pages 1 and 2. Which means if you are anywhere below it, your product will not be visible to the majority of users.
So,
Having that keyword or related words in your title, thus, makes your chances of appearing on the first page of the search engine brighter.
You can find the keywords for your products using search engine’s search suggestions.
Let’s explain with an example.
Suppose you want to upload a butterfly tea infuser on Inspire Uplift Marketplace.
Write a related word that hops into your mind into the search engine, say “butterfly infuser”
Don’t press Enter. Quickly the search engine will return the related results in the drop-down menu. These are actually the related search terms that people around the world have entered.

Choose the most relevant keyword from the list. We will choose the 6th one, “butterfly tea infuser”.
You can go deeper into these keywords by entering different variations.
Also, once you have finalized the keyword, check in the search engine if it returns similar products like yours.

Good, let’s move to the next step.
Step 5: Selecting product’s type
Select the type of the product.
The type is set as “Physical” by default. Keep it selected if it’s a physical product like a table lamp or a water bottle, etc.
If it’s a digital product like a downloadable PDF, JPG OR PNG file, etc., select “Digital”.

Step 6: Writing the product description
Add product description in the “Description” box. It should include all the features, benefits, working and other explanations of your product in proper formatting.
Tell the user exactly what will be in the package.
If there are any safety precautions, indicate that. There is no limit on the number of words you use in this section.
You can bold specific words, add bullets, make a table, include an image or a video here, too.

You should also include your keywords here. Don’t stuff them, though. It’s neither search engine-friendly nor the user reading your description will appreciate it.
Using keywords will help you to rank better in search engines and your chances of sales will increase rapidly.
Remember, the user cannot see your product in real life. It’s the words that will explain how it works, what its features are, what does it do and how it will solve their problem effectively.
This written description will be shown here on the product page.

For ease, you can use the description pattern top sellers have used on the Marketplace 👇. It’s one of the best approaches you can take.

Why is it a great way?
- The information is properly formatted in bullets and short paragraphs.
- Long paragraphs are a big no. Users usually turn away from them.
- The benefits of the product are bold-ed. This urges the user to read them.
- Each and every detail e.g. “1/8” thick”, “#65 Stainless Steel” is mentioned.
You can use ChatGPT to write your product descriptions as well.
This AI software takes less time to write a description. But make sure it looks natural, not robotic. But how?
You see, ChatGPT works on prompts…
Prompts are actually the commands that you give it as a user. It evaluates the command and tries to return an optimized answer to you using its insanely powerful algorithm.
Here is a helpful prompt that will let you write a superb product description:

You’ll be impressed with the provided product description. Mind it; we have used the paid version of GPT-4 for this prompt.


If you face difficulty in getting the desired results, experiment by breaking your prompts this way.

Followed by:

That being said, there are always other prompts that you can get from the internet. Test them and choose the ones that best suit your needs.
But be cautious:
It can give you false results as well. So never rely completely on it. Have a human writer/editor/copywriter crosscheck every generated version of the product description.
Step 7: Entering relevant product category
Enter the category of your product. Choose the most suitable main category and subcategory. This ensures that users can view your product easily while searching for it within Inspire Uplift Marketplace.

For example,
If the user is looking for knee pads, he will access the “knee pads” category from the menu bar of the Inspire Uplift marketplace.
If you have placed your product somewhere else, he might not find it.
BE VERY CAREFUL WHILE SELECTING THE CATEGORIES.
Because not being cautious can impact your sales negatively 📉.
Step 8: Adding relevant product tags
Add relevant product tags in the “Tags” box. This is extremely important for your products to appear in the internal search of Inspire Uplift marketplace.
For example, if you add “phone holder” tag for your smartphone product, whenever the user enters “phone holder” in the search bar, your product will appear somewhere in the results.

This increases the visibility chances of your product, and the likelihood to get a sale.

Step 9: Adding features for short description
Add features in the “Features” box. This is actually the summary of your product. Include all the important details here in short bullet points.
You have to add each feature separately. The maximum character limit for each feature is 150 characters.

This section is for the users who don’t have time to read the long description and are looking for a short explanation of what the product is and what it does.
You can write up to 1500 characters here.
Here’s a good example of what this section should look like.

Step 10: Adding the images & video
Then add the gallery images of your product. The ideal image size is 1080 x 1080 pixels. You can add up to 15 images to the gallery. If you have a product video, you can upload that as well.
Select only high-quality images because these are the first thing the user will see after landing on your product page.
These will impact his decision to buy the product or not.

If your images are high in quality, show all the angles and showcase the working, it will create an excellent impact on the user.
And he will be more likely to purchase it.
Maximum size of the image can be 8 MB.
Follow these considerations while uploading the images:
- The featured image (the first image the user sees) should likely be a lifestyle image.
- Add images that do not become pixelated when zoomed.
- Show all angles of the product.
- Show the product in use so the buyers can see its practical implementation.
- Use keywords to name the images e.g. if your keyword is “pet scooper”, the image file name could be “petscooper1.jpeg.”
- You can change the order of the images by dragging them.
- You can also resize and rotate the images.
- Select the featured image by checking the circle on the top left side of the image.

Step 11: Adding the pricing
Add the price (in dollars) in the “Price” box. It’s highly recommended you fill the “Compare at Price” box because then it will appear as a discounted price on the product page.

When the users see the discount, it motivates them to make a purchase psychologically. Your chances of availing a sale will increase.

If you don’t, your pricing will appear to be less impactful.

If you wish, you can add the “Cost per Item” so you can analyze the profit earned on the purchases from the “Finance” option present on the left side of the seller panel.
Also, add the “Available Quantity” according to your inventory. You can monitor the orders and the inventory of your shop from the “Orders” option present on the left side of the seller panel.

Step 12: Adding personalization information (if applicable)
What if you want to add customization information for your products?
Such as adding a JPEG file or the name of the person.
You will check the “Personalization” option as shown below

In the “Instruction for Buyer” box, write down all the details you want your buyer to enter. The maximum character limit here is 250 characters.
An example is shown below.

Check the “Personalization is optional” option if it’s relevant to your product.

The personalization message will be shown as such on the product page.

Step 13: Adding expedited shipping (if applicable)
If you want to add fast shipping for your product, you have to check this option and add the shipping fee.

Note that Inspire Uplift Marketplace offers free shipping but since it would take a long delivery time for some of the products, we have added this option for the sellers.
So if you have the capability to implement expedited shipping, mention that with the shipping fee, as shown in an example below.

Select the “Continue selling when out of stock” if you want to keep receiving orders even if the quantity of the product is finished.

Step 14: Adding variants (if applicable)
If you want to add variants of your product, select the “This product has options” option.

You can add as many variants as you want. Name them according to your wish. Here’s an example.

Point to note: You can only select the image slider of one property.
And only that property will cause the variant images to change.
In the above example, only when the user clicks the “Black”, “Gray” and “Brown” variants, will the gallery images change.
No other property (Style, Size) will cause them to change.
Variants will be shown as the list below.

Now you have to assign an image to each variant. To do so, select all the three “Black” variants, click on “Update Image” and select the image from the gallery as the variant image.

Repeat this process for the other two colors in this example.
Implement in the same manner for your products.
Step 15: Saving the product
Press “Save”. That’s it.
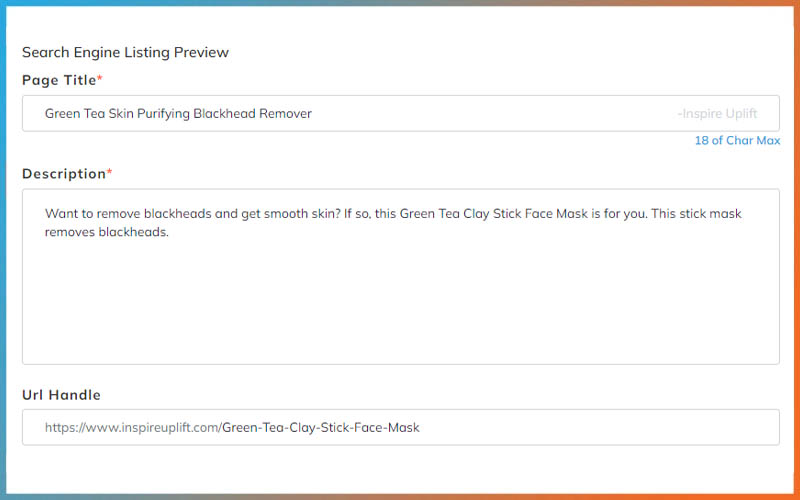
Step 16: Adding the meta title & description
Scroll down to enter the meta title and meta description of the product.
These will be shown in the search results of the search engines so make it as clickable as possible. But don’t make it clickbait.
The meta title is generally kept at 60 characters max while the description is kept at 155 characters max.
Add a CTA in the description.
You have successfully added your product to Inspire Uplift Marketplace in the most SEO-friendly (search engine optimization-friendly) and visibility-friendly manner.
Concluding lines
You can always contact the 24/7 support of Inspire Uplift at sellers@inspireuplift.com if you have any more queries. We reply within a day.
Happy uploading!